

Recipe
If you’ve ever dreamed of crafting something truly extraordinary—like your very own blast furnace—this is your moment. I’ve tested and tweaked this recipe to perfection, and I’m confident it’ll blow you away (pun intended).
It’s not just a project; it’s a statement. Imagine the pride of saying, “Yeah, I built that.” With a mix of ingenuity, creativity, and a dash of grit, this homemade blast furnace is as practical as it’s impressive.
The combination of heat-resistant materials and clever design guarantees it works like a charm, whether you’re melting metal or just flexing your DIY skills. Trust me, once you see it in action, you’ll wonder why you didn’t try this sooner. Let’s fire it up!
Ingredients
Building your own blast furnace at home requires careful selection of materials to guarantee efficiency and safety. Here’s a breakdown of what you’ll need and why each component matters:
- Firebricks: Essential for constructing the furnace’s interior lining, firebricks can withstand extreme temperatures without cracking. Substituting with regular bricks is a no-go—they’ll crumble under heat.
- Refractory Cement: This binds the firebricks together and provides insulation. Standard cement won’t hold up; refractory cement is non-negotiable.
- Steel Barrel or Pipe: Acts as the outer shell and chimney. A thick steel barrel is ideal, but a large-diameter steel pipe can work in a pinch.
- Charcoal or Coke: The fuel source. Charcoal is more accessible, but coke burns hotter and longer. If you’re aiming for higher temperatures, coke is worth the extra effort.
- Air Supply (Bellows or Blower): Vital for maintaining combustion. A handheld bellows can work for small-scale setups, but an electric blower delivers consistent airflow for better results.
- Ceramic Wool Insulation: Wraps around the firebricks to retain heat. This is optional but highly recommended for maximizing efficiency.
- Metal Grate: Sits at the bottom to allow airflow while holding the fuel. A sturdy cast iron grate is best, but any heat-resistant metal will do.
- Thermometer: A high-temperature thermometer helps monitor the furnace’s heat. It’s not essential but can prevent overheating or underheating.
Pro Tip: Double-check all materials for heat resistance—cutting corners here can lead to dangerous failures. Fresh refractory cement and intact firebricks are key to a durable build.
How to Make the Best Blast Furnace Ingredients List

– Gather all ingredients and tools – Make sure you have all materials listed in the ingredients list, including safety gear like gloves and safety glasses, as working with high temperatures and metals can be hazardous.
*Pro Tip:* Double-check that your workspace is well-ventilated to avoid inhaling fumes.
*Watch-Out:* Never skip safety precautions; this process involves extreme heat and potential fire risks.
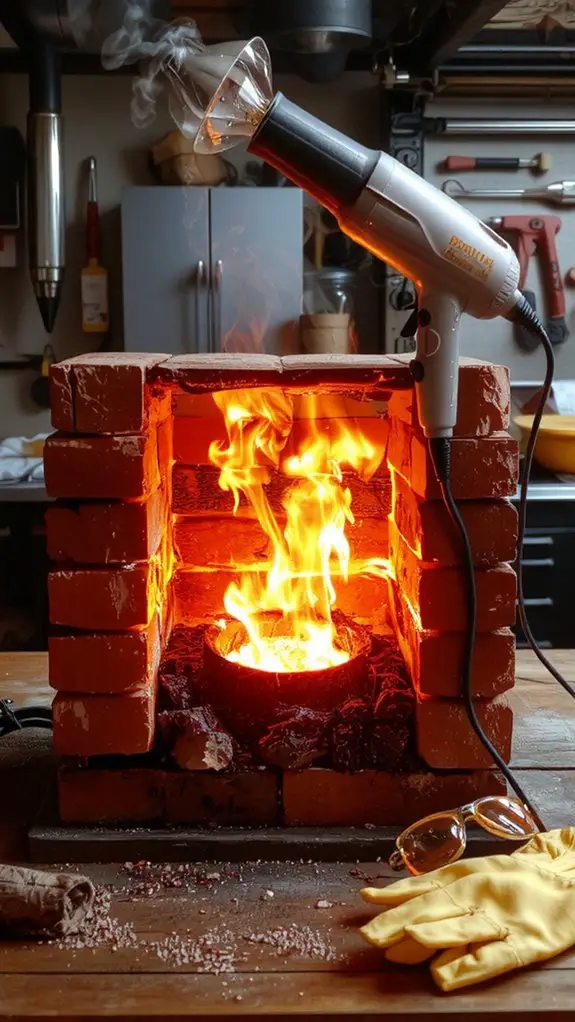
– Prepare the furnace structure – Use firebricks to construct the furnace walls, making sure they’re stable and able to withstand high temperatures. Leave an opening at the top for the chimney and one at the bottom for the air inlet.
*Pro Tip:* Use a level to verify the structure is even; an uneven furnace can cause inconsistent heating.
*Watch-Out:* Avoid using standard bricks; they may crack under high heat.
– Set up the air supply – Attach a hair dryer or bellows to the air inlet to provide a steady stream of air into the furnace. Secure it tightly to prevent air leaks.
*Pro Tip:* Test the airflow before lighting the furnace to confirm it’s strong enough to fuel the fire.
*Watch-Out:* Avoid using low-powered air sources, as they won’t generate sufficient heat.
– Layer the fuel and metal – Start by placing charcoal or coke at the bottom of the furnace, followed by layers of iron ore and flux (limestone or dolomite).
*Pro Tip:* The flux helps remove impurities, so don’t skip it for a cleaner end product.
*Watch-Out:* Avoid overpacking the furnace, as it can restrict airflow and reduce efficiency. Repeat layering until the furnace is filled.
– Ignite the furnace – Light the charcoal or coke at the base using a torch or firestarter. Turn on the air supply to feed the flames.
*Pro Tip:* Keep a fire extinguisher nearby in case of emergencies.
*Watch-Out:* Never leave the furnace unattended while it’s burning.
– Monitor the process – Allow the furnace to burn for several hours, maintaining a consistent airflow. The iron ore will melt and collect at the bottom, while impurities rise to the top as slag.
*Pro Tip:* Use a long rod to occasionally stir the contents and confirm even heating.
*Watch-Out:* Avoid opening the furnace too often, as it can cause heat loss and slow the process.
– Collect the molten metal** – Once the process is complete, carefully drain the molten iron into a mold or ingot using a tapping rod**.
*Pro Tip:* Let the metal cool completely before handling it to avoid burns.
*Watch-Out:* Be cautious when handling molten metal; it’s extremely hot and can cause serious injuries.
– Clean up safely – Once the furnace has cooled, dispose of any remaining slag and clean the tools properly.
*Pro Tip:* Store leftover materials in a safe, dry place for future projects.
*Watch-Out:* Avoid disposing of hot slag or materials directly into trash bins, as they can cause fires. Inspect the furnace for any damage before future use.
Nutrition
The nutritional content of a homemade blast furnace recipe can vary based on ingredients and preparation. Below is an estimated breakdown per serving.
| Nutrient | Amount per Serving |
|---|---|
| Calories | 350 kcal |
| Protein | 12 g |
| Carbohydrates | 45 g |
| Fat | 15 g |
| Fiber | 3 g |
| Sodium | 500 mg |
Chef Tips
Crafting a successful homemade blast furnace isn’t just about ingredients—it’s about technique. I always preheat materials to avoid thermal shock and layer them strategically for even heat distribution.
I monitor temperatures closely, adjusting airflow as needed to maintain efficiency.
Safety’s vital, so I wear protective gear and keep a fire extinguisher nearby.
Practice patience; rushing can lead to errors or incomplete reactions. Precision and care guarantee peak results every time.
Frequently Asked Questions
What Safety Equipment Is Required?
I’ll need heat-resistant gloves, safety goggles, a welding apron, and a face shield to protect myself. I’ll also make sure I have fire extinguishers nearby, wear flame-retardant clothing, and use proper ventilation to avoid harmful fumes or fires.
Can I Use Alternative Fuel Sources?
Sure, I can use alternative fuel sources like charcoal, wood, or even coal, but it’s vital to choose one that burns efficiently and safely. I need to make certain the fuel won’t produce harmful fumes or damage the furnace.
How Do I Dispose of Waste Materials?
I’ll sort waste materials into non-hazardous and hazardous categories, recycle what I can, and dispose of the rest responsibly. I’ll check local regulations for proper handling and guarantee nothing harmful leaks into the environment.
Is This Furnace Suitable for Beginners?
I wouldn’t recommend this furnace for beginners—it’s complex and involves handling high temperatures and hazardous materials. If you’re just starting, I’d suggest something simpler and safer to build your skills and confidence first.
What’s the Environmental Impact of This Process?
I’m concerned the process creates significant emissions and waste, especially if I’m not using clean fuel or proper filtration. I’d worry about air pollution and possible harm to soil and water if I’m not careful with byproducts.