
Recipe
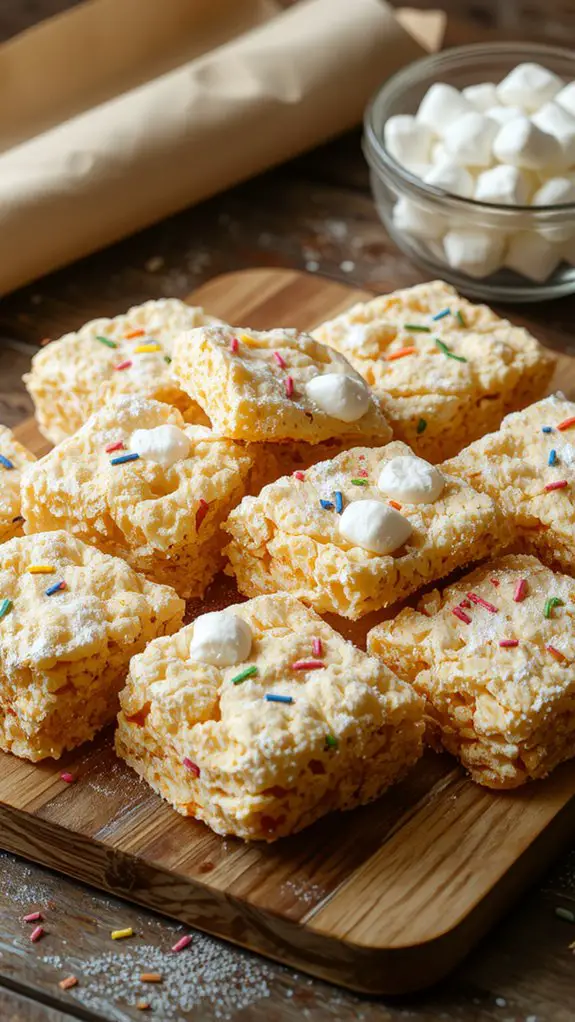
You’re about to make the *best* Rice Krispie Treats of your life—yes, I said it. This classic recipe gets a glow-up with a secret ingredient that takes them from good to “can’t-stop-eating-them” levels of amazing.
Marshmallows melt into creamy perfection, butter adds richness, and a pinch of salt balances the sweetness for a treat that’s soft, chewy, and downright irresistible.
Whether you’re a total beginner or a seasoned dessert pro, this recipe is foolproof and ready in minutes. Trust me, one bite of these gooey, crispy squares, and you’ll never go back to store-bought.
Let’s get started—your sweet tooth will thank you!
Ingredients
The key to perfect Rice Krispie Treats lies in the simplicity of the ingredients and a few chef-approved tweaks. Using high-quality staples guarantees that nostalgic, chewy texture we all love, while optional additions can take them to the next level. Here’s what you’ll need:
- Butter: Unsalted butter is ideal for controlling the sweetness. Don’t skimp—it’s the secret to a rich, buttery base. *(Substitute: Salted butter works too, but reduce added salt.)*
- Marshmallows: Mini marshmallows melt faster and more evenly than large ones. *(Substitute: Vegan marshmallows for a dairy-free option.)*
- Rice Krispies Cereal: Fresh, crispy cereal is non-negotiable for that signature snap. *(Substitute: Other crispy rice cereals will work in a pinch.)*
- Vanilla Extract: A splash adds depth and enhances the overall flavor—don’t skip it! *(Substitute: Vanilla bean paste for an extra layer of richness.)*
- Salt: A pinch of salt balances the sweetness and highlights the flavors.
*Optional Add-Ins*:
- Chocolate Chips: Melted or sprinkled on top for a decadent twist.
- Sprinkles: Add a festive touch for parties or celebrations.
- Peanut Butter: Swirl it in for a creamy, nutty variation.
*Pro Tip:* For the best texture, use fresh ingredients and avoid over-mixing the cereal to keep it light and airy.
How to Make the Best Classic Rice Krispie Treats

- Prepare Your Pan and Ingredients: Lightly grease a 9×13-inch baking dish with butter or cooking spray. Measure out all ingredients beforehand—this guarantees a smooth process and prevents scrambling mid-recipe.
- Melt the Butter: In a large pot, melt 1/4 cup of butter over low heat. Keeping the heat low prevents the butter from browning, which could alter the flavor of your treats.
- Add the Marshmallows: Once the butter is melted, add 10 ounces of mini marshmallows (or about 4 cups). Stir constantly until the marshmallows are completely melted and smooth. This step requires patience—don’t rush it! Overheating can make the marshmallows tough.
- Incorporate the Cereal: Remove the pot from the heat and quickly stir in 6 cups of Rice Krispies cereal. Use a spatula to gently fold the cereal into the marshmallow mixture until evenly coated. Avoid overmixing, as it can crush the cereal and make the treats dense.
- Press into the Pan: Transfer the mixture to the prepared baking dish. Lightly grease your hands or a spatula with butter or cooking spray and press the mixture evenly into the pan. Press gently—over-packing can make the treats too hard.
- Let It Set: Allow the treats to cool completely at room temperature for at least 1 hour before cutting. Resist the urge to speed this up by refrigerating, as it can dry them out.
- Cut and Serve: Once set, use a sharp knife or a bench scraper to cut into squares. For clean cuts, wipe the knife with a damp cloth between slices. Enjoy immediately or store in an airtight container for up to 2 days.
Pro Tip: For an extra touch, drizzle melted chocolate or sprinkle with colorful sprinkles before the treats set.
Watch-Out Warnings: Don’t use stale marshmallows or cereal, as they can affect texture. Avoid high heat when melting marshmallows—it can lead to a sticky, gooey mess instead of a smooth mixture.
Nutrition
Rice Krispie Treats are a classic dessert that’s easy to make and loved by many. Here’s the nutritional breakdown for a standard serving.
| Nutrition Facts | Per Serving (1 bar) |
|---|---|
| Calories | 90 |
| Total Fat | 2g |
| Saturated Fat | 1g |
| Cholesterol | 0mg |
| Sodium | 85mg |
| Total Carbs | 18g |
| Dietary Fiber | 0g |
| Sugars | 10g |
| Protein | 1g |
Chef Tips
When making Rice Krispie Treats, I always recommend using fresh marshmallows for the best texture—stale ones won’t melt as smoothly.
Don’t overheat the marshmallows; low heat guarantees they stay gooey without scorching.
Add a pinch of salt to balance the sweetness.
For extra flavor, swap butter for browned butter or mix in vanilla extract.
Press the mixture lightly into the pan to keep it soft and chewy.
Frequently Asked Questions
Can I Use Vegan Marshmallows for This Recipe?
I’d definitely use vegan marshmallows for this recipe—they work just like regular ones. I’ve swapped them in before, and they still give the same gooey, chewy texture. Just make sure they’re melted well for the best results.
How Do I Store Rice Krispie Treats to Keep Them Fresh?
I store my rice krispie treats in an airtight container at room temperature to keep them fresh. If it’s hot, I’ll pop them in the fridge, but they stay chewier when kept at room temp.
Can I Add Food Coloring to the Mixture?
Yes, I can add food coloring to the mixture if I want vibrant treats. I’ll mix it into the melted marshmallows before adding the cereal so it blends evenly. Gel coloring works best for bold, consistent color.
Are Rice Krispie Treats Gluten-Free?
Rice Krispie treats aren’t gluten-free unless you use gluten-free Rice Krispies and check all other ingredients. I always double-check labels, as some marshmallows or butter might contain gluten traces I’d miss otherwise.
How Long Do They Take to Set Before Cutting?
They usually take about 30 minutes to set before I can cut them. I let them cool at room temperature, but if I’m in a rush, I’ll pop ‘em in the fridge for 10-15 minutes.