
Recipe
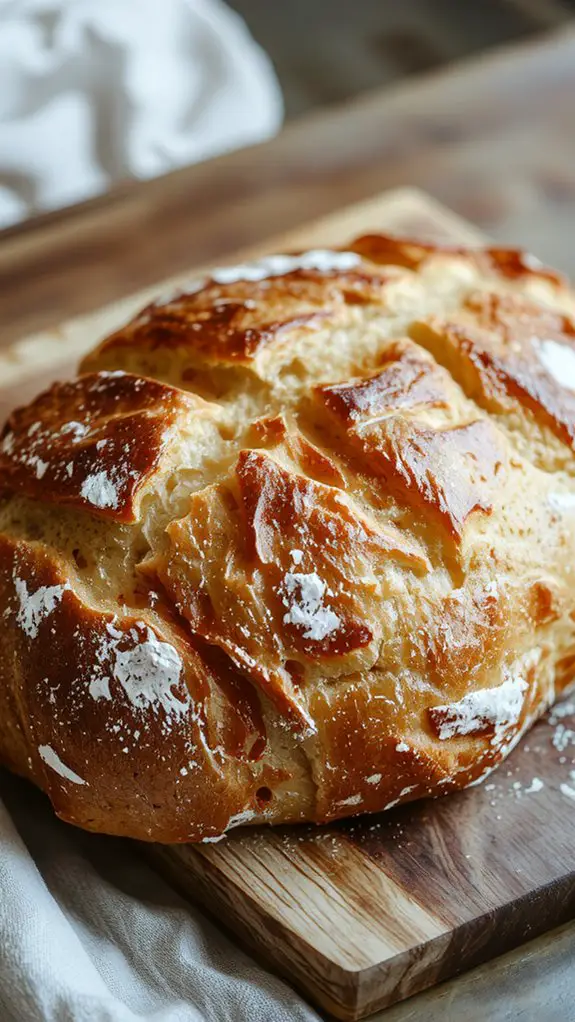
There’s something downright magical about baking your own sourdough bread—the crackling crust, the tangy aroma filling your kitchen, and that first bite of chewy, airy perfection. This isn’t just any bread; it’s a labor of love that rewards patience with flavor you simply can’t buy at the store.
What makes it special? A lively, bubbly starter (your secret weapon) and a slow, natural fermentation that gives it that signature depth. Trust me, once you taste homemade sourdough, there’s no going back.
And don’t worry—even if you’re new to bread-making, this recipe breaks it down into simple, foolproof steps. Get ready to impress yourself with a loaf that’s golden, crusty, and bursting with character. Let’s bake!
Ingredients
Great sourdough starts with simple, quality ingredients—no fancy flours or gadgets required. The magic lies in how you use them. Here’s what you’ll need, plus insider tricks to make your loaf shine:
– Active sourdough starter (100g): The heart of your bread. If it doesn’t float in water, it’s not ready—wait until bubbly and lively.
No starter? Mix equal parts flour and water for 5–7 days to cultivate your own.
- Bread flour (500g): Higher protein = better gluten structure. All-purpose works, but your crumb won’t be as open.
- Water (350g, lukewarm): Filtered if your tap is heavily chlorinated. Too cold slows fermentation; too hot kills the starter.
- Salt (10g): Fine sea salt dissolves evenly. Skip iodized—it can taste metallic. *Non-negotiable* for flavor and dough strength.
- Rice flour (for dusting): Prevents sticking without burning like regular flour. Cornmeal works in a pinch.
Pro tip: Weigh ingredients—volume measurements vary wildly. A kitchen scale is your secret weapon for consistency.
How to Make the Best Classic Sourdough Starter Recipe

– Prepare the Starter: Verify your sourdough starter is active and bubbly. Feed it with equal parts flour and water, and let it sit at room temperature for 4-6 hours until it doubles in size.
*Pro Tip: A healthy starter will float in water when ready.*
– Mix the Dough: In a large bowl, combine the active starter, water, and flour. Mix until a shaggy dough forms. Let it rest for 30 minutes (autolyse).
*Watch Out: Avoid overmixing at this stage—just combine until no dry flour remains.*
– Add Salt and Knead: Sprinkle salt over the dough and knead gently for 5-10 minutes by hand or in a stand mixer until smooth and elastic.
*Why: This develops gluten for structure.*
– First Rise (Bulk Fermentation): Cover the dough and let it rise at room temperature for 4-6 hours, folding it every 45-60 minutes.
*Visual Cue: The dough should double in size and feel airy.*
– Shape the Loaf: Turn the dough onto a floured surface and shape it into a round or oval loaf. Place it seam-side up in a floured proofing basket.
*Pro Tip: Use a bench scraper to handle sticky dough easily.*
– Second Rise (Proofing): Cover the shaped loaf and let it proof for 1-2 hours at room temperature or overnight in the fridge.
*Flexibility: Chill overnight for extra flavor development.*
– Preheat and Score: Preheat your oven to 475°F (245°C) with a Dutch oven inside. Score the top of the dough with a sharp knife or razor blade.
*Why: This allows for controlled expansion during baking.*
– Bake: Carefully transfer the dough into the hot Dutch oven, cover, and Bake for 20 minutes. Remove the lid and bake for another 20-25 minutes until golden brown.
*Visual Cue: The internal temperature should be 200-210°F (93-99°C).*
– Cool: Let the bread Cool on a wire rack for at least 1 hour before slicing.
*Watch Out: Cutting too soon can make the crumb gummy.*
Nutrition
Sourdough bread is a nutritious option, rich in fiber and beneficial bacteria. Here’s the nutritional breakdown per slice (about 50g).
| Nutrient | Amount per Slice |
|---|---|
| Calories | 120 kcal |
| Carbohydrates | 23 g |
| Fiber | 2 g |
| Protein | 4 g |
| Fat | 1 g |
| Sodium | 200 mg |
Chef Tips
Mastering sourdough can be tricky at first, but I’ve found a few key tips that’ll help you get consistent results.
Keep your starter active by feeding it regularly and using it at its peak.
Use a kitchen scale for precise measurements, and don’t rush the fermentation—cold proofing enhances flavor.
Score the dough deeply for better oven spring, and bake in a preheated Dutch oven for a crispy crust.
Frequently Asked Questions
Can I Use Whole Wheat Flour Instead of White Flour?
Yes, I can use whole wheat flour instead of white flour, but I’ll need to adjust hydration since it absorbs more water. My bread might be denser, but I’ll still get that hearty, nutty flavor I love.
How Do I Store Sourdough Bread to Keep It Fresh?
I keep my sourdough bread fresh by storing it in a bread box or a paper bag, which lets it breathe. If I need it to last longer, I wrap it in a towel and freeze it.
Why Did My Bread Turn Out Dense?
I think your bread turned out dense because you might’ve overproofed it, didn’t knead enough, or used too much flour. Weak starter or not enough steam in the oven can also make it heavy. Check these next time!
Can I Freeze Sourdough Starter?
Yes, I can freeze my sourdough starter. I’ll feed it, let it double, then transfer it to a freezer-safe container. When thawed, I’ll refresh it with equal parts flour and water to revive it before baking.
How Do I Know if My Starter Is Ready to Use?
I’ll know my starter’s ready when it’s doubled in size, has a bubbly, frothy surface, and smells tangy and slightly sweet. If it floats in water, I’m confident it’s active and can be used for baking.